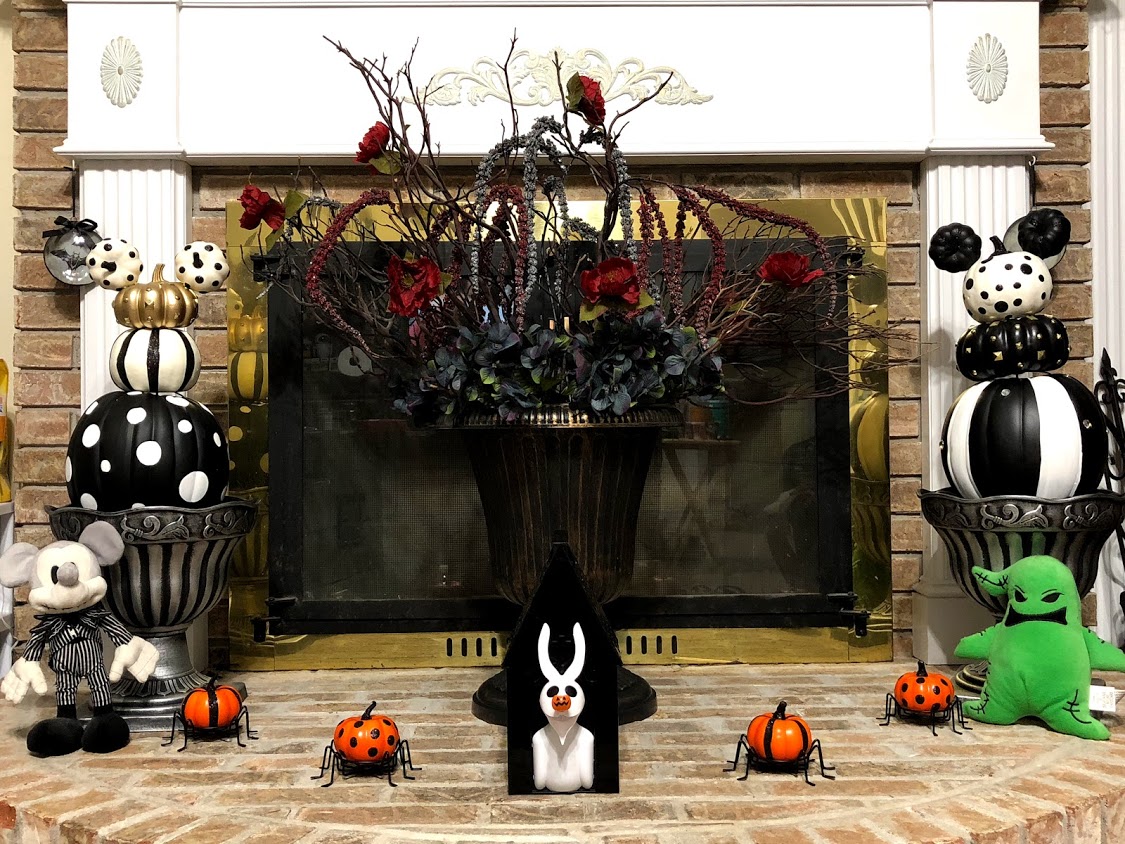
Happy Thursday Main Streeters. With less than a week until All Hallows Eve, it’s still not too late to decorate for the festivities. Today, I’m going to share with you an easy DIY project with a Disney twist that you can use to decorate your home for Halloween and even keep up through the Thanksgiving holiday.
You’ll need a few things to build your topiary:
- Foam Pumpkins of various sizes (large, medium, small, and extra small)
- You can get these at stores like Michael’s, JoAnn’s, Hobby Lobby, Walmart and Target. Don’t be scared to mix it up and use pre-decorated pumpkins or to make them really unique feel free paint the pumpkins and decorate them as you see fit – Crafter’s Tip: use available coupons to save a few dollars.
- Plastic Garden Urn
- These are available to purchase on-line, or at places like Dollar General, Lowe’s, or Home Depot. A quick internet search will bring up a bunch of places where you can order or find these.
- 1 Foam Board
- Purchase at Walmart or Dollar Tree
- Stones / Spanish Moss / Fall Florals
- This is optional, just for aesthetic but you can find these supplies at Dollar Tree or craft stores
- Wooden Skewers
- 18 gauge wire
- Exacto Knife
Once you have collected all the supplies, it’s time to build your topiary.
To create my custom topiary, I used pumpkins of various sizes that I collected from Target and Goodwill, and some that I painted from Michaels, left over from my Tim Burton inspired bridal shower last year.
Step 1 – Choose 5 pumpkins (1 large for the base, 1 medium for the middle, 1 small for the top, 2 extra small to make the Mouse Ears).
Step 2 – With your exacto knife, carefully remove the top stump from the large pumpkin and medium pumpkin. This will help to make sure your pumpkins stack comfortably on one another. You can either saw it off or cut a hole in the top of your foam pumpkin to remove that stump.
Step 3 – Take your small pumpkin and a wooden skewer. Carefully lance the skewer into the middle of the small pumpkin until it is sturdily connected to the skewer. Make sure you leave enough to attach the medium pumpkin.
Step 4 – With your small pumpkin and the excess skewer, gently lance the medium pumpkin until the small pumpkin in resting flush on top of the medium pumpkin. This is the start of the top of the topiary.
Step 5 – You may find that now the top of the topiary is a little bulky. In order to safely secure it to the bottom level/large pumpkin, I recommend using two skewers or 2 pieces of the 18-gauge wire to lance the middle of the bottom medium pumpkin at an angle. It should look like an upside down ‘V’.
Step 6 – Gently push the medium pumpkin on to the large pumpkin until they are flush. You should now have 3 stacked pumpkins.
Step 7 – If you are using a plastic garden urn, you will need to create a flat surface to place the topiary on. Measure the circumference of the inside of the urn.
Step 8 – Once you have an estimated size of the interior circumference, draw this on to your foam board. Use the exacto knife to cut out the circle.
Crafter’s Tip: For an easier measurement, flip your plastic urn over and trace the circle – then subtract 1.5 inches from that circle.
Step 9 – Lay the circle inside the urn to create a flat surface. It doesn’t have to be perfect, it just has to be level. If you made your circle too big, carefully use the exacto to size the foam circle down until it fits securely and level in the urn.
Step 10 – This is an optional step. If your level surface is close to the top of the urn and you don’t wish to see the foam board, you can choose to cover the foam circle with stones, fall florals, or Spanish moss. Make sure to leave a circle in the middle where you will nest the whole topiary.
Step 11 – Now it’s time to add your “ears”. Take the extra small pumpkins and flip them so the stem of the pumpkin faces out. You will use either the skewer or the wire to lance the side of the pumpkin, place them like mouse ears on top of the small pumpkin.
Step 12 – Take the whole topiary and place it in the center of the urn; and you’re done! You don’t have to secure the topiary to the foam if the interior is level.
This is the finished product at my house. It was a fun and quick DIY project.

Tell us Main Streeters, would you try this project at home? If you do, make sure to share pictures with us!
Until next week!

- Will Galaxy’s Edge be available during Extra Magic Hours? - May 23, 2019
- Three Limited Disney Rewards for Summer - May 16, 2019
- Walking in Walt’s Footsteps - May 9, 2019


