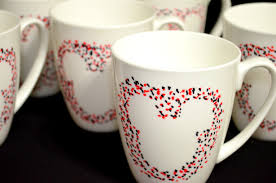
Happy Thursday Main Streeters and Welcome Back! We are almost half way through December and with Christmas rapidly approaching, you may find yourself in a pinch for a truly special, but budget friendly Disney gift. We here at The Main Street Mouse have you covered, especially because the weather is gradually becoming colder; at least for us Floridians. Northerners have been playing in snow for weeks, so this DIY Disney Mug tutorial is a perfect little cup of magic to warm up those bones.
Here is what you need to get started:
- Plain mug (you can find them on Amazon or at places like Dollar Tree or Walmart)
- oil-based Sharpie paint markers (must be oil-based sharpies, regular sharpies will gradually wash off)
- adhesive stencils or stickers (you can use dollar store contact paper as stencil too)
- rubbing alcohol
- cotton balls
- nail polish remover and Q-Tips for cleaning up any mistakes or smudges
- cookie pan
- oven
Now that you have your supply list, first thing’s first, before we even start the project you will need to clean your mug. Using the rubbing alcohol and cotton balls, give the mug a good wipe down. You want to do this to remove any grime or oils from people handling the mug prior to purchase, and it ensures that the stencil as well as the oil-based sharpie paint sticks to your mug. Let the mug totally dry.
Once your mug is dry, follow these steps:
- Find a stencil/sticker you want to outline. Sometimes you can find Disney stickers at craft stores and you can use this as a stencil, or if you have a crafting machine like the Silhouette or the Cricket, you can use contact paper or vinyl to create the stencil of your choice.
- Adhere the stencil to the mug
- Once the stencil is firmly in place, grab your oil-based Sharpie paint markers and start making dots. Get as creative as you want here, use tons of colors, or use one color. Whatever makes you happy. For an ombre effect cluster the dots close to the stencil and then gradually create dots with space between them as you move outwards of the design.
- If you make a mistake, or don’t love how a dot came out, take nail polish remover and a Q-Tip to “erase” the mistake.
- Finish up your project and peel the stencil off the mug.
- Let the mug sit for 24 hours. This isn’t always necessary, but I highly recommend it so the oil-based paint really has time to sink in to the mug.
- Once you have let the mug sit, place the mug on a cookie pan and put it in a cold oven.
- Fire up the oven to 425*, adjust accordingly if you have a convection oven. It’s important that the mug be placed in the oven before it’s started, so it goes through pre-heat with the oven. Doing so avoids the possibility of cracking because of the sudden change in temperature.
- After the oven and your mug has pre-heated to the desired temperature. Set a timer for 30 additional minutes.
- Once the timer goes off – turn off the oven and leave the mug inside. You want it to cool down with the oven, again to avoid the possibility of cracking.
- Remove the mug from the oven! YOU’RE DONE!

This is a fantastic project to do alone or with kids. It’s really easy and really fun. For an extra special touch, you can use your mug as a little gift basket by adding 1 or 2 instant hot cocoa pouches, a candy cane, and some marshmallows inside, then wrapping with cellophane paper and add a bow with curling ribbon to secure the “basket”.
What I love about this project is that you can also use the oil-based sharpie’s to create custom kitchenware such as matching plates, bakeware, etc. Tons of options to keep the DIY gifts going. You also don’t have to limit yourself to using stencils, if you’re a good artist, or have neat handwriting you can use the markers to write your favorite quote, or draw the face of your favorite character on a mug. No one says you have to make the art with dots, you can do outlines, shapes, or squiggles. Really, it’s all what your imagination desires.
That’s it for this week! If you take on this DIY project please share your final product with us!
Until next week!

- Will Galaxy’s Edge be available during Extra Magic Hours? - May 23, 2019
- Three Limited Disney Rewards for Summer - May 16, 2019
- Walking in Walt’s Footsteps - May 9, 2019


