Re-post!

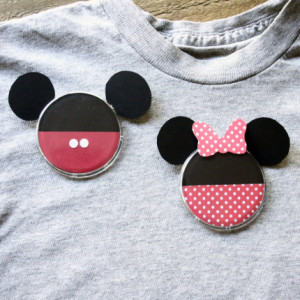
Here’s another cute crafting idea from Disney Family! This one’s for Mickey or Minnie buttons, here’s how to make your own~
What You’ll Need
Cardstock (black, red, white, red polka dots)
Design-a-button kit (found at most craft stores)
Scissors or craft knife
Double-sided tape
Pencil
Glue
Compass
Ruler
Hole punch
How To Make It
1 For Mickey:
– Draw a circle 1 1/16″ wide with a compass on black cardstock, then cut it out.*
*the DIY button kit used came with 2.25″ buttons so this circle fits perfectly inside of this size. You’ll need to adjust the circle size based on the button size you purchase.
– Draw a circle 1 1/16″ wide with a compass red cardstock, then take a ruler and draw a line down the middle. Cut the half circle out.
– Draw 2 black circles on black cardstock (these will be the ears). Cut them out but make sure to leave a tab on each ear so they can be attached with a piece of double-sided tape.
– Punch 2 holes out of the white cardstock. Set them aside.
– Put double-sided tape on the back of the red half circle. Position it so it covers half of the black circle.
– Dab 2 small dots of glue in the middle of the red half circle, place the small white “buttons” there. Wait until the glue dries then place the entire piece face forward inside of the button. Put the back of the button on.
– Put double-sided tape onto the tabs on the ears. Position them on either side of the button and press to adhere them. Fold the ears forward a little to help them stay. You can also use glue on the ear tabs, if you don’t plan on reusing the button for another craft.
2 For Minnie:
– Draw a circle 1 1/16″ wide with a compass on black cardstock, then cut it out.*
*the DIY button kit used came with 2.25″ buttons so this circle fits perfectly inside of this size. You’ll need to adjust the circle size based on the button size you purchase.
– Draw a circle 1 1/16″ wide with a compass red polka dot cardstock, then take a ruler and draw a line down the middle. Cut the half circle out.
– Draw 2 black circles on black cardstock (these will be the ears). Cut them out but make sure to leave a tab on each ear so they can be attached with a piece of double-sided tape.
– Draw a big bow on the red polka dot cardstock, then cut it out.
– Put double-sided tape on the back of the red polka dot half circle. Position it so it covers half of the black circle.
– Place the entire piece face forward inside of the button. Put the back of the button on.
– Put double-sided tape onto the tabs on the ears. Position them on either side of the button and press to adhere them. Fold the ears forward a little to help them stay. You can also use glue on the ear tabs, if you don’t plan on reusing the button for another craft.
– Put a small piece of double-sided tape on the back of the red polka dot bow, towards the bottom. Position it so it slightly overlaps the ears on either side. Press firmly to adhere the bow.
Notes
Craft is not intended as an independent activity for young children. Parents should not let small children handle the pins as we do not assume liability or risk for use of this craft. Please be safe had have fun!
- Disney Adventure World: Disneyland Paris Reimagines 2nd Park - April 12, 2024
- Honest Review – 1900 Park Fare Reopens at the Grand Floridian - April 11, 2024
- Hungry? Give City Works at Disney Springs a try! - April 9, 2024


