


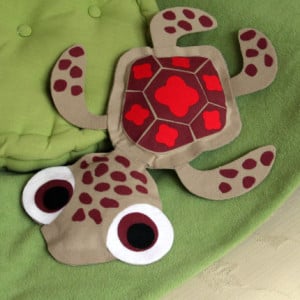
Here’s another cute craft idea from Disney Family! This one is for the Finding Nemo fan in your life! Make your own Squirt pillow, here’s how~
What You’ll Need
•
Scissors
•
Tape
•
12- by 18-inch sheet of stiff tan felt
•
Straight pins
•
Double-sided fusible web (such as Steam-A-Seam2)
•
Steam iron and pressing cloth (for adhering the fusible web)
•
Ruler
•
½ yard (44-inch width) tan flannel or felt
•
9- by 12-inch piece of maroon flannel or felt
•
Sticky-back felt (red, white, and black)
•
Fabric glue
•
Small craft paintbrush for applying the fabric glue
•
A handful of pinch-style clothespins or large paper clips
•
Polyester fiberfill (or other suitable filling for stuffing the pillow)
•
Wooden spoon
How To Make It
- 1
 Print the template and cut out the pieces. Tape the three pillow base sections (head, left body, and right body) together where indicated. Then use the assembled base to cut a large turtle shape from the stiff tan felt.
 Tip: You’ll need to turn the template slightly askew to make it fit atop the felt sheet.
- 2
 Use the specified template pieces to cut the head and the shell under layer shape from the tan flannel (or felt).
 - 3
 Now cut three 9- by 12-inch pieces from the tan flannel. Adhere each piece to a sheet of double-sided fusible web, following the instructions on the package. Then use the specified template pieces to cut out four flippers, the face, another head shape, and another shell under layer shape from the fused flannel. When you’re done, cut the shell top layer template piece from the center of the under layer template, as shown, and use it to cut out a fused flannel shell top.
 - 4
 Adhere the maroon flannel (or felt) to another sheet of fusible web. Use the template pieces to cut out the center, front, side, and back shell plates from the maroon flannel. Flip the latter three pieces over and use them as patterns for cutting out matching pieces for the opposite facing side of the shell. From the remaining maroon flannel, cut a pair of eye irises and a bunch of small irregular-shaped spots about ½ to 1 inch wide (you’ll need about three dozen total).
 - 5
 Fuse a dozen or so of the maroon spots to the upper two thirds of the flannel face, as shown. Next, fuse the flannel flippers to the flippers on the stiff felt base. Then fuse the remaining maroon spots to the lower ends of the flippers.
 - 6
 Fuse the maroon shell plates to the shell top, spacing them slightly apart so the tan flannel shows between them. Cut out a single center shell decoration plus six of the smaller shell decorations from red sticky-back felt, and attach the cutouts to the tops of the shell plates, as shown.
 - 7
 Cut a pair of eye whites from white sticky-back felt and a pair of pupils from black sticky-back felt. Fuse each of the maroon irises to the center of an eye white. Then top each iris with a pupil, but instead of centering it, place it close to the right edge of the iris so that the turtle will appear to be looking off to one side.
 - 8
Fuse the two flannel head pieces together back-to-back so that you have a double-thick piece. Do the same with the shell under layer.
- 9
 Stick the eyes in place on the head. Then fuse the face piece atop the head, as shown.
 - 10
Center the decorated shell top on the under layer, and fuse the two pieces together.
- 11
 Place the assembled head atop the pillow base. Following the directions on the bottle, use fabric glue to stick the neck portion to the stiff felt. Then glue the outer edges of the flannel head to the felt, leaving a 2-inch opening at the nose for stuffing the head with fiberfill later. (Note: The glued seams should be about ½ inch wide). Now place the assembled shell atop the base, and again glue the edges together, leaving an opening at the pointed back end for stuffing the shell. Use clothespins or paper clips to hold the edges in place until the glue dries.
 - 12
Stuff the head and shell with fiberfill, using the handle of the wooden spoon to push the filling into the curves if needed. Glue the openings closed, again using clothespins to hold the edges together. Allow the glue to thoroughly dry, and the pillow is ready to use.
 Print the template and cut out the pieces. Tape the three pillow base sections (head, left body, and right body) together where indicated. Then use the assembled base to cut a large turtle shape from the stiff tan felt.
  Use the specified template pieces to cut the head and the shell under layer shape from the tan flannel (or felt).
  Now cut three 9- by 12-inch pieces from the tan flannel. Adhere each piece to a sheet of double-sided fusible web, following the instructions on the package. Then use the specified template pieces to cut out four flippers, the face, another head shape, and another shell under layer shape from the fused flannel. When you’re done, cut the shell top layer template piece from the center of the under layer template, as shown, and use it to cut out a fused flannel shell top.
  Adhere the maroon flannel (or felt) to another sheet of fusible web. Use the template pieces to cut out the center, front, side, and back shell plates from the maroon flannel. Flip the latter three pieces over and use them as patterns for cutting out matching pieces for the opposite facing side of the shell. From the remaining maroon flannel, cut a pair of eye irises and a bunch of small irregular-shaped spots about ½ to 1 inch wide (you’ll need about three dozen total).
  Fuse a dozen or so of the maroon spots to the upper two thirds of the flannel face, as shown. Next, fuse the flannel flippers to the flippers on the stiff felt base. Then fuse the remaining maroon spots to the lower ends of the flippers.
  Fuse the maroon shell plates to the shell top, spacing them slightly apart so the tan flannel shows between them. Cut out a single center shell decoration plus six of the smaller shell decorations from red sticky-back felt, and attach the cutouts to the tops of the shell plates, as shown.
  Cut a pair of eye whites from white sticky-back felt and a pair of pupils from black sticky-back felt. Fuse each of the maroon irises to the center of an eye white. Then top each iris with a pupil, but instead of centering it, place it close to the right edge of the iris so that the turtle will appear to be looking off to one side.
  Stick the eyes in place on the head. Then fuse the face piece atop the head, as shown.
  Place the assembled head atop the pillow base. Following the directions on the bottle, use fabric glue to stick the neck portion to the stiff felt. Then glue the outer edges of the flannel head to the felt, leaving a 2-inch opening at the nose for stuffing the head with fiberfill later. (Note: The glued seams should be about ½ inch wide). Now place the assembled shell atop the base, and again glue the edges together, leaving an opening at the pointed back end for stuffing the shell. Use clothespins or paper clips to hold the edges in place until the glue dries.
Michele Atwood is the Owner/Editor of The Main Street Mouse and its subsidiaries. Co owner of the House of Mouse Expo & Lost Princess Apparel. Author of the books “Moving to Main Street U.S.A.” “How Many Sleeps Till Disney?” and “How Many Sleeps Till Disneyland?”
Michele also contributes theme park news for Fox 35 Orlando 11pm news and on the radio on WDBO.
Michele also contributes theme park news for Fox 35 Orlando 11pm news and on the radio on WDBO.
Latest posts by Michele (see all)
- Raglan Road Celebrates World Whiskey Day, 1/2 price flight - May 15, 2024
- Selena Gomez – First Look for ‘Wizards Beyond Waverly Place’ - May 14, 2024
- Passholder Preview Info, Tiana’s Bayou Adventure - May 14, 2024