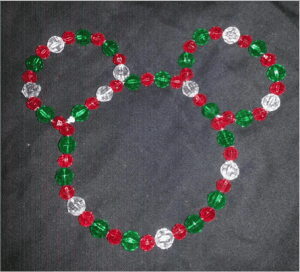
Make Your Own Mickey Mouse Icon Bead Ornament by Guest Blogger Amy Anderson
Supplies:
20 – 10 mm Faceted Green Beads
31 – 8 mm Faceted Red Beads
10 – 10 mm Faceted Clear Beads
20 Gauge Wire
Mickey Mouse Head Template
Instructions:
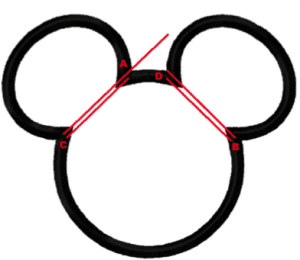
Step 1 – Bend wire following a Mickey Mouse head template. Leave a little extra hanging over when starting. Begin at the point where the top of the head and the left ear join (Point A). Go around the left ear and then down the left side of the head. Continue around to where the right ear and the top of the head join (Point D). Go around the right ear and across the top of the head. Leave a little extra when you get back to the starting point. You will have two wires going across the bottom of both ears.
Step 2 – Start putting the beads on in the order you choose from the left ear. (I did red, green, red, green, red, white and repeat sequence.) Put the beads on until the beads are solid from the two wires that meet on the right ear (Point C) and where the bottom of the left ear meets the face (Point B).
Step 3 – Take the wire and put it through the beads so the wires are doubled in the beads (Between Point C & A). Usually it is about 3 beads but decide what you like best.
Step 4 – Finish putting beads on the right ear and pull the wire through the beads where the wires are doubled (Between Point B & D). Similar to the left ear.
Step 5 – Put the beads across the top of the head and you are done with adding beads. Take the 2 extra amounts of wire and tie the ends off. I wrapped the 2 wires together and then wrapped that around a space between 2 beads.
Step 6 – Lay your Beaded Mickey Mouse Head onto your template and shape your ornament the way you like it.
Congrats you have now made yourself a Beaded Mickey Mouse Ornament. You can either add a ribbon to the top or hang it with an ornament hook.
- EPCOT Food & Wine Fest Dates, Details Announced - April 23, 2024
- Daydream Believing! - April 19, 2024
- Disney Adventure World: Disneyland Paris Reimagines 2nd Park - April 12, 2024


