When the crypt doors creak and the tombstones quake, spooks come out for a swinging wake! Yes friends, it’s almost that time when all the spooks and ghouls descend upon us, and we get to throw those fun Halloween parties for friends, family, and obviously, the kids. So, what can you feed them that will leave a memorable impression with a Disney twist?
Why, when those spooks show up to your Halloween party this year, be prepared with some delicious Grim Grinning Ghost Treats, of course! These ghoulishly delightful treats are sure to put a smile on anyone’s face and add a little soul in their bellies. In just a few easy steps you can make these cookie treats for your party, or just to have fun around the house.
First, you are going to collect all your ingredients.
- Cookies:
- The best to use based on shape are Nutter Butter, Vienna Fingers, any flavor Milano
- White and Turquoise chocolate melting chips
- You can find these at any craft store that also sells baking and cake decorating supplies
- Shortening or melting crystals
- Black decorating gel or dark chocolate melting chips
- Also, found at craft stores, or with the cake mixes at your local grocery store.
- Optional sugar eyes
You’ll need the following supplies at the ready to dip and decorate your cookie treats:
- Microwave safe bowl
- Fork
- Whisk/Spoon for stirring
- Parchment or wax paper
- Optional tape – to secure parchment paper
- Optional squeeze bottle
The instructions below are for 6 treats. You can adjust the recipe accordingly if you plan to make more.
Step 1) Shake crumbs off the cookies. This is important so you don’t have lumpy ghosts.
Step 2) In a microwave safe bowl, add one large handful of white chocolate melting chips and 5 turquoise discs.
Step 3) Melt the chips in the bowl for 18 seconds in intervals. Stir the chocolate mixture in between each interval until the chocolate is nice and smooth giving you that classing Haunted Mansion “ghost blue” color.
Please note: the amount of time it takes to melt the chocolate varies depending on your microwave wattage, so make sure to periodically check the mix; you don’t want to burn the chocolate.
I’ll also let you in on a little chocolate making secret; if the chocolate is not thinning out during melting, add a small amount of shortening or the melting crystals. This will give you the desired texture to coat your cookies.
Step 4) While the chocolate is melting, roll out some parchment paper and secure it to the table with tape so it doesn’t roll back up. You will need this ready for Step 6.
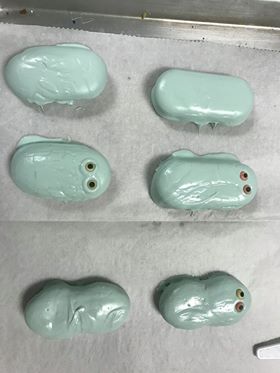
Step 5) Dip cookies one at a time into the chocolate using your fork. You will want to rest the cookie on the fork, not stab the cookie to dip. Tap the fork on the side of the bowl allowing extra chocolate to drip off and release air bubbles.
Step 6) Place the dipped cookies onto the wax paper to dry.
Step 7) OPTIONAL if you have found sugar eyes and want to use them, place them onto the cookie while the chocolate is still wet.

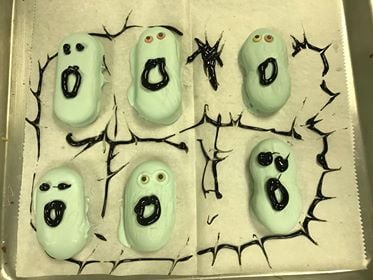
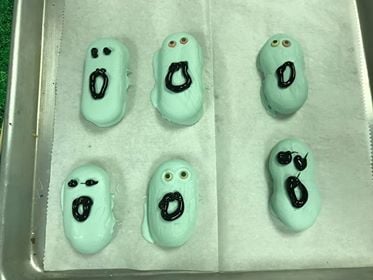
Step 8) Once the chocolate has hardened, use the black icing gel to make the eyes and mouth. If you decide to use dark chocolates for this step, melt it the same way as you did for step 3. Add the chocolate to the squeeze bottle and make your faces.
Here is an example of the finished product.


You are now ready to place the Grim Grinning Ghost treats out for your guests to enjoy! Don’t be afraid to get creative when you display them. I find that a fun way to show them off would be to lay some crumbled chocolate sandwich cookies on a tray, like dirt, and have the ghosts coming out of the ground.
Let your guests know that if these ghosts follow them home, they are more than welcomed to eat them.
Happy Halloween everyone!
- Grim Grinning Ghost Cookies! What a Treat! - October 23, 2018
- The Legend of the Headless Horseman - October 7, 2018
- Cooking Up Some Disney Fun - September 26, 2018


