
Oh dEAR! – a DIY Ear Display


Hi Main Street Mouse Family! Happy Friday! The weekend is upon us, and I’m here to share a super fun and easy DIY project for those very memorable accessories many of us collect at the parks. That’s right, Disney EARS!
I confess, I am a bit of an addict when it comes to ears, heck, I even opened my own small business to make them. I just love the idea that you can be as creative as you want when you showcase your Disney Side. Especially when the ears are personalized, that’s the best kind of accessory.
Now, what do you do with all those fabulous ears when you aren’t wearing them at the park? Before I made my ear display, they would sit sadly in a Disney drawer, never to be shown off unless I was at a park. My ears became what Cogsworth and Lumiere were in the Beast’s castle, collecting dust in a drawer. One day after organizing my ears I thought, “I want to display them”. So I got to crafting, and I came up with a really cool concept to show off my ears.
Here is what you are going to need:
2 Foam Boards – 20 x 30 inch [You can get these at Dollar Tree. If you don’t have a Dollar Tree any craft or hobby shop will carry them. To keep costs low on this project, find a coupon or wait for a sale to acquire the foam board]
Glue Gun
Glue Sticks
2 yards of Fabric [I really like using Disney licensed fabric, which I acquire on sale and stack coupons at my local Jo-Ann’s to keep my cost low]
Roll of 1 inch Wide Ribbon [You can pick any color that coordinates with your fabric, but make sure the ribbon is sturdy. Satin and Grosgrain work really well]
Screw in Cup Hooks [I recommend buying a pack. They are always handy to have around the house after using them for this project. You can get them any size or any color, and they are found at Hardware Store, or the Home Improvement section of Target, Walmart, etc.]
Now that you have your materials follow these simple steps to make your ear display:
Step One: Lay your fabric out flat on the floor, with the design side facing down.
Step Two: Take one (1) of the foam boards and lay it on top of the fabric.
Step Three: Mark a 1.5 inch border on the fabric around the foam board.
Step Four: Cut the fabric around the border you made and put the excess fabric aside.
Step Five: Cut 1 inch diagonal slits into the corners of the fabric (this will come in handy later).
Step Six: Cut your ribbon to a length that you want for hanging the display (I like to glue the ribbon to the corners of the foam board, so my ribbon tends to be longer).
Step Seven: At the top of the foam board, fold the top of the fabric onto the back of the board and glue it down to the foam board. You will only do this for the top section. This is similar to wrapping a present.
Step Eight: Take the ribbon you cut and adhere that using the glue gun to the top of the foam board.
Step Nine: Generously place glue on the back of the foam board you have been working with. Make sure to pay special attention to the corners, and work quickly so the glue doesn’t dry.
Step Ten: Take the second foam board and lay it exactly on top of the first foam board to glue together. You will now have two stacked foam boards, with the ribbon and folded fabric at the top of the first foam board wedged in between.
Step Eleven: With the remaining fabric border, you will repeat step seven to wrap the rest of the fabric to the back of the new foam board. CRAFTERS TIP: Wrap the bottom of the foam board FIRST. Pull your fabric taught and then adhere to the back. This avoids the fabric becoming slouchy on the front of the board.
You should now have a fully wrapped foam board! You’re almost done!
Step Twelve: Flip over your foam board to the side where your fabric is face up. This is the front of the Ear Display.
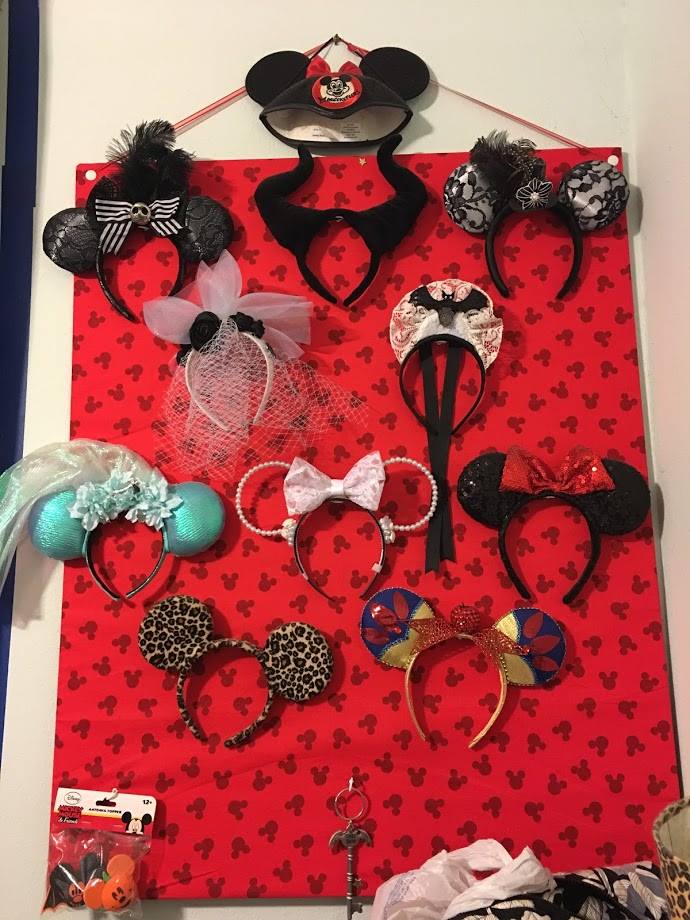
Step Thirteen: Take the cup hooks and arrange them on the foam board to display your ears. You will end up pushing the cup hook through the fabric and into the foam until you hear a ‘pop’. Then screw the hook in until it is flush with the fabric and foam. You can typically get 13 ears on one board if you window the ears.
Step Fourteen: Find a place to hang your ear display.
Step Fifteen: Hang your ears! You can either keep the cup hooks facing up and place the ears in the cup of the hook, or make the cup hook flat by turning it sideways, and set the middle of the ears to balance on the hook. There is no right or wrong way to hang your ears!
That’s it friends! Super easy DIY ear display. At most this project will cost you $15-$20, but that is pushing the price tags of items. Additionally, if you really want to get fancy, you can physically frame your ear display. I like to check out local thrift shops and garage sales for beautiful and ornate frames. If you find a large one you like, grab it! You may have to cut your foam boards to fit the frame, but you have the tutorial now to make it work.
Happy crafting Main Streeters! Be sure to show us your awesome ear displays next week!
Erika is excited to be on the TMSM team and where Disney Parks are concerned, you won’t catch her dead on It’s a Small World. If she asks to ride that, this is a clear indication that she is in danger and you must send help. You will, however, catch her performing Random Acts of Disney (R.A.D’s), park hopping with her amazing group of impressively talented and kind friends (usually in some themed attire), hanging out by The Haunted Mansion, and ugly crying during fireworks… then begging for a Mickey Premium Bar to eat her feelings…this is a judgment-free bio.
Otherwise, Erika works for the State of Florida and is actively involved in her community. Erika believes in empowering others and spreading kindness to people from all walks of life. Erika also makes custom designed Disney inspired ears, etched glass, gifts, and accessories. You can check out, like or follow her work on FB, which also links to my shop’s Instagram: www.facebook.com/imagineering.emporium. She looks forward to getting to know everyone and sharing the magic of Disney!
- Will Galaxy’s Edge be available during Extra Magic Hours? - May 23, 2019
- Three Limited Disney Rewards for Summer - May 16, 2019
- Walking in Walt’s Footsteps - May 9, 2019